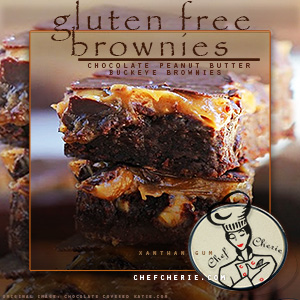
Cinnamon Chip Pumpkin Cookies

Cinnamon Chip Pumpkin Cookies
Print Recipe
Servings Prep Time
18 cookies 45 min
Cook Time
8 - 10 min
Servings Prep Time
18 cookies 45 min
Cook Time
8 - 10 min
Cinnamon Chip Pumpkin Cookies
Print Recipe
Servings Prep Time
18 cookies 45 min
Cook Time
8 - 10 min
Servings Prep Time
18 cookies 45 min
Cook Time
8 - 10 min
Ingredients
Servings: cookies
Instructions
  1. Melt the butter in the microwave. In a medium bowl, whisk the melted butter, brown sugar, and 1/2 cup granulated sugar together until no brown sugar lumps remain. Whisk in the vanilla and pumpkin until smooth. Set aside.
  2. In a large bowl, toss together the flour, salt, baking powder, baking soda, 1 and 1/2 teaspoons cinnamon and pumpkin pie spice. Pour the wet ingredients into the dry ingredients and mix together with a large spoon or rubber spatula. The dough will be very soft. Fold in the cinnamon chips. They may not stick to the dough because of the melted butter, but do your best to evenly disperse them in the dough. Cover the dough and chill for 30 minutes, or up to 3 days. Chilling is mandatory.
  3. Take the dough out of the refrigerator. Preheat the oven to 350°F. Line two large baking sheets with parchment paper or silicone baking mats.
  4. Roll the dough into balls, about 1.5 Tablespoons of dough each. Mix together the remaining 1/2 cup of granulated sugar and 1/2 teaspoon of cinnamon. Roll each of the dough balls generously in the cinnamon-sugar mixture and arrange on 2 baking sheets. Slightly flatten the dough balls because the cookies will only slightly spread in the oven. The photo above shows what the cookie dough balls should look like before baking.
  5. Bake the cookies for 8-10 minutes. The cookies will look very soft and underbaked. Keeping them in the oven for longer may dry them out. Remove from the oven and press a few more cinnamon chips onto the tops, if desired. If you find that your cookies didn't spread much at all, flatten them out when you take them out of the oven.
  6. Allow the cookies to cool for at least 10 minutes on the cookie sheets before transferring to a wire rack. The longer the cookies cool, the chewier they will be. I let them sit out for at least 1 hour before enjoying. I find that their chewiness and pumpkin flavor is more prominent on day 2.
  7. Make ahead tip: Cookies stay fresh covered at room temperature for up to 1 week. You can make the cookie dough and chill it in the refrigerator for up to 3 days.2 Allow to come to room temperature and continue with step 3. Baked cookies freeze well - up to three months. Unbaked cookie dough balls freeze well - up to three months. Bake frozen cookie dough balls for an extra minute, no need to thaw.
Recipe Notes

Featured Spice: 

Cinnamon, ground

Pumpkin Pie Spice

Recipe source: Sally's Baking Addiction - Cinnamon Chip Pumpkin Cookies

Share this Recipe
Powered byWP Ultimate Recipe

Gluten-Free Chocolate Chocolate Chip Cookies (Xanthan)

Gluten-Free Chocolate Chocolate Chip Cookies (Xanthan)
Print Recipe
Servings
18 - 24 cookies
Cook Time
15 min
Servings
18 - 24 cookies
Cook Time
15 min
Gluten-Free Chocolate Chocolate Chip Cookies (Xanthan)
Print Recipe
Servings
18 - 24 cookies
Cook Time
15 min
Servings
18 - 24 cookies
Cook Time
15 min
Ingredients
Servings: cookies
Instructions
  1. Whisk together buckwheat flour, sorghum (jowar) flour, brown rice flour, tapioca starch, cocoa, xanthan gum, sea salt, baking powder, cane sugar & light brown sugar.
  2. Add in coconut oil, bourbon vanilla extract & vanilla rice milk.
  3. As you beat the dough pay close attention to the consistency. Add more rice milk a tablespoon at a time, and beat to combine, until you achieve a smooth but sturdy cookie dough.
  4. Preheat the oven to 375ºF. Line one or two baking sheets with parchment paper or an Exopat liner.
  5. Stir in the chocolate chips as best you can (the dough is stiff).
  6. Roll a golf ball sized wad of dough between your palms, and place the ball on the lined baking sheet about two inches apart. Repeat this process to make 18-24 balls. Use your palm to press down on the dough and flatten slightly- not too much- unless you like your cookies thin. Press a few extra chocolate chips into the tops of the cookies, if you like.
  7. Bake in the center of a preheated oven for about 15 minutes until the cookies are set. They will still be slightly soft in the center. If you bake two pans at once, rotate the pans half way through baking.
  8. Remove the pans from the oven, and allow the cookies to cool and "set" for a few minutes; then use a thin spatula to move the cookies to a wire rack. The cookies will get crisper as they cool.
Recipe Notes
Share this Recipe
Powered byWP Ultimate Recipe
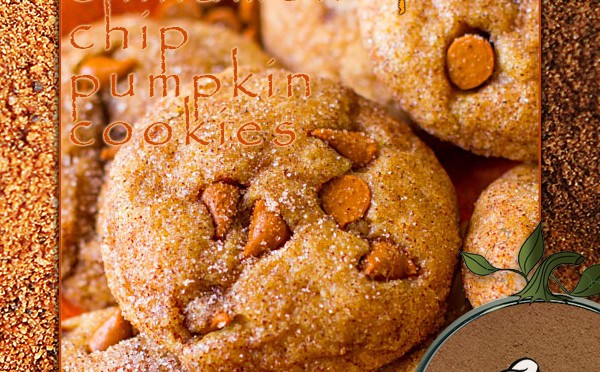
Chocolate Peanut Butter Brownies (Xanthan)

Chocolate Peanut Butter Brownies (Xanthan)
Print Recipe
Chocolate Peanut Butter Brownies (Xanthan)
Print Recipe
Ingredients
Servings:
Instructions
  1. Brownie Layer: Preheat your oven to 330F and grease a 9×13 pan. Set aside. In a large mixing bowl, whisk together all liquid ingredients with the flax. (Note: If baking with coconut oil, melt first and have all other liquid ingredients be at room temperature to prevent hardening.) In a separate bowl, thoroughly combine all remaining ingredients. Pour wet into dry, stir to combine, and pour into prepared pan. Bake 16 minutes. Brownies will look underdone when they come out but this is okay! Let cool, then refrigerate overnight and the texture will firm up nicely. DO NOT frost and eat until the next day, as the taste and texture will change while they set. (If you’d prefer a flourless option, you can use 1.5x my Black Bean Brownies as the base instead.)
  2. Peanut Butter Layer: Do this after the brownies have set: Bring the peanut butter to room temperature if it’s been chilled, then stir all ingredients together until smooth. It will look thin at first, but keep stirring until it gets thick! Spread evenly over the brownies, then refrigerate at least 2 hours. Then make the chocolate, leaving the brownies in the fridge until the chocolate is already made:
  3. Chocloate Layer: Stir together all ingredients until a thin sauce forms. If sauce is too thick, gently heat until thin. Spread evenly over the brownies, then immediately put back in the fridge to harden the coating. Once hard, you can cut the brownies. My trick is to cut brownies with a plastic knife, wiping the knife after every cut. Store leftovers in the fridge, or they are actually really good frozen as well!
Recipe Notes

Featured Spices:

Unsweetened Cocoa Powder

Xanthan Gum

Recipe and original source: Yummly / ChocloateCoveredKatie.com

Share this Recipe
Powered byWP Ultimate Recipe